Configure SQL Server Backup to URL Using Azure Cloud Shell
Happy Monday, everyone.
I had to do something this weekend that involved the SQL Server feature backup to URL which allows you to back up databases in a SQL Server instance directly to Azure blob storage. That PowerShell there is quite the adventure … and cumbersome. There’s a much easier way to get this done using Cloud Shell up in Azure. I used Bash, but I’m sure there’s an equivalent Azure CLI PowerShell way as well.
Backup to URL/Restore from URL works from Transact-SQL and the SQL Server PowerShell cmdlets. There is no UI option in SSMS. Figure 1 shows what happens when I tried to restore a valid backup stored in a URL in version 18.4. I hope this eventually gets fixed. For all graphics in this post, click on them to enlarge.
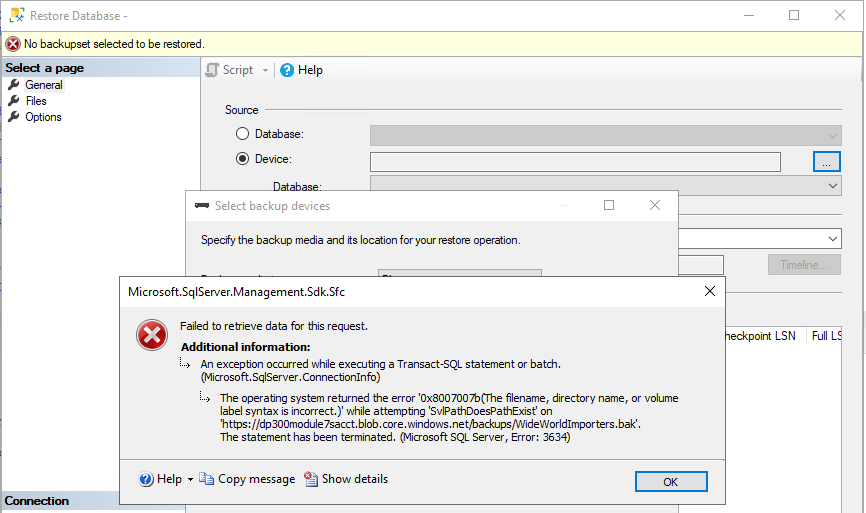
Figure 1 – Thanks for playing … don’t try again.
Storage Accounts and Access Keys
This post assumes you already have a storage account in Azure. To do nearly anything, you need one. You can create a special one just for backups if desired, but it’s not necessary. Work with your IT admins to see what the general direction is here if you already have a presence in Azure.
Whatever storage account you use, you’ll need three things: the name of the resource group that contains the storage account if using Cloud Shell, the storage account name, and the access key for the storage account. You can get the storage account name and the key from the Azure Portal. It can be found on the Access keys blade for the Storage Account as shown in Figure 2.
As an aside, the fact all of the menu things are not capitalized for the first letter completely drives me NUTS. Yes, I get that’s how things are today so get off my lawn. But if people stuck to it or used it consistently, I’d be fine – annoyed, but none worse the wear. Look at the screen shot below. Storage Explorer (which is a specific service in Azure) versus everything else (i.e. Access keys). Boy, that shift key is really, really hard for those extra words, no? Anyway …
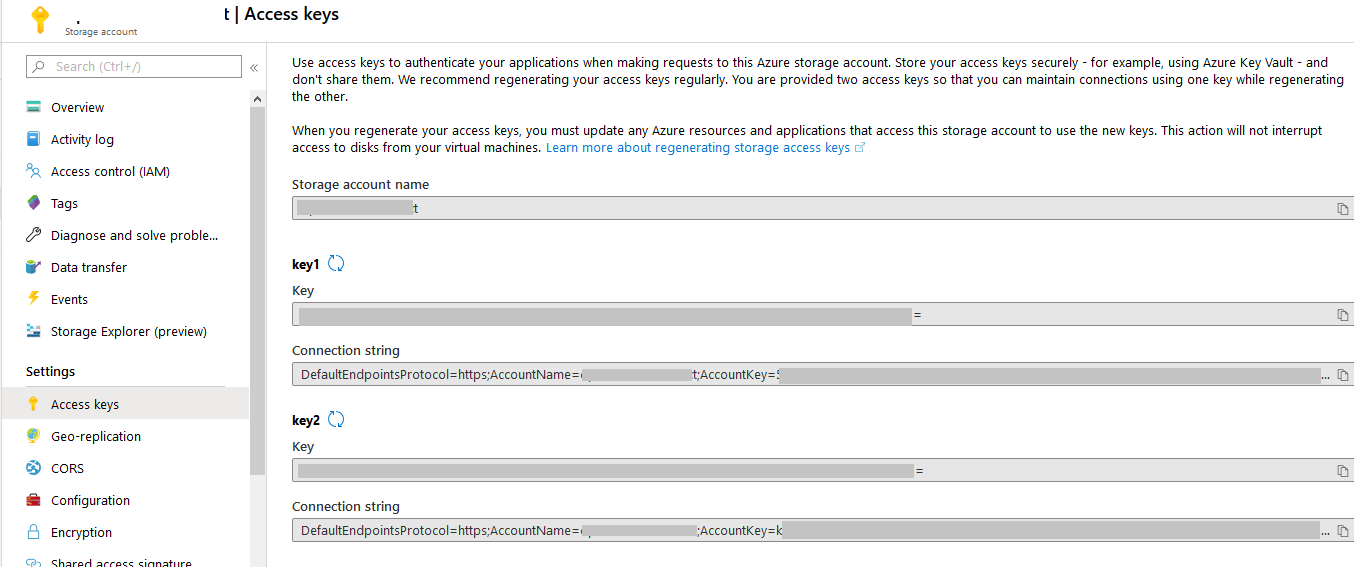
Figure 2 – Access Keys in Azure.
If you don’t want to use bash to put the storage account key into a variable, you can just cut and paste from the Azure Portal. Stick it in a Notepad (or equivalent on your OS) document if you want that you don’t save; it’s just a file to keep open so you don’t have to keep navigating back to that blade.
To get the access key using in Bash and set it to a variable, execute the following command:
[code]storageaccountkey= $(az storage account keys list -n “storage_account_name” -g “resource_group_name” –output tsv –query “[?keyName == ‘key1’].value”)[/code]
Tip: you could also put the storage account name into a variable since you’re going to use it a few times, but if you have it handy, it’s just as easy to cut and paste. Don’t overthink things.
Containers and the Shared Access Signature
The backup file you generate in SQL Server or restore from is stored in a container as a blob.
If there is already a container you will use, you can skip this step. If a container is not created already or you want to use a different one, create a container in the storage account. Below is the syntax for Bash:
[code]az storage container create –name “container_name” –account-name “storage_account_name” –account-key $storageaccountkey –fail-on-exist[/code]
Now you have to generate the shared access signature (SAS). This is how you will set up the secure access to the blob up in Azure. -o tsv is the same as –output tsv which takes care of the double quotes at the beginning and end of the output. Remember to set the value for the expiration date (–expiry) well into the future. The date is in UTC format.
[code]az storage container generate-sas -n “container_name” –account-name “storage_account_name” –account-key $storageaccountkey –permissions “rwdl” –expiry “2020-05-31T00:00Z” -o tsv[/code]
A big long string of text like the one below is generated. After that happens, you use it in the Transact-SQL used to create the credential in SQL Server.
[code]se=2020-05-31T00%3A00Z&sp=rwdl&sv=2018-11-09&sr=c&sig=%2BRUJldVzQHFdh7lZAeynfRuZr5dUeUohfVwKHZZX3jE%3D[/code]
Create the SQL Server Credential
Creating the the credential in SQL Server is a simple Transact-SQL statement.
[code]IF NOT EXISTS
( SELECT * FROM sys.credentials
WHERE name = ‘https://storage_account_name.blob.core.windows.net/container_name’)
BEGIN
CREATE CREDENTIAL [https://storage_account_name.blob.core.windows.net/container_name]
WITH IDENTITY = ‘SHARED ACCESS SIGNATURE’,
SECRET = ‘se=2020-05-31T00%3A00Z&sp=rwdl&sv=2018-11-09&sr=c&sig=%2BRUJldVzQHFdh7lZAeynfRuZr5dUeUohfVwKHZZX3jE%3D’
END;
GO[/code]
That’s it. You should be able to back up to and restore from a blob in Azure. Figure 3 shows a successful database backup of WideWorldImporters to Azure using Transact-SQL.
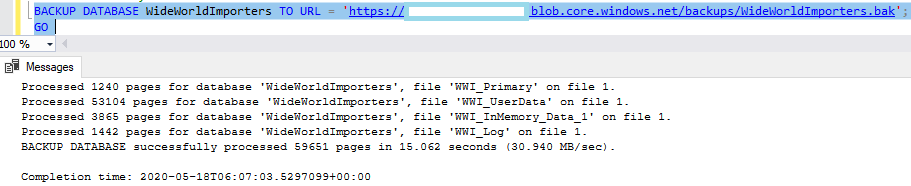
Figure 3- It really works!
The backup file WideWorldImporters.bak can be seen in Figure 4.
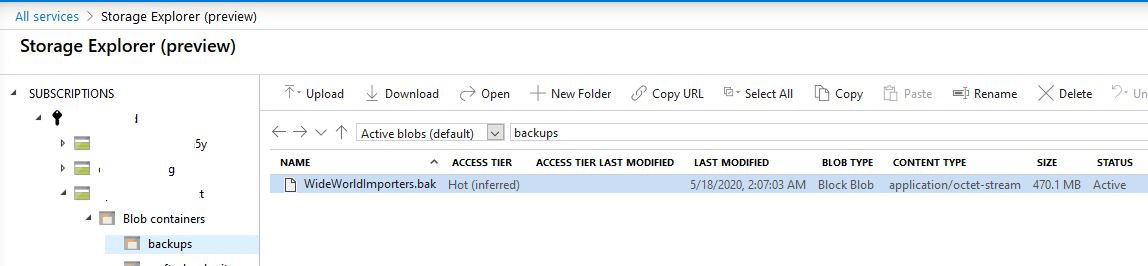
Figure 4 – WideWorldImporters in Azure blob storage
The error message below appears if something is configured wrong.
[code]Msg 3201, Level 16, State 1, Line 33
Cannot open backup device ‘https://storage_account_name.blob.core.windows.net/container_name/WideWorldImporters.bak’. Operating system error 50(The request is not supported.).
Msg 3013, Level 16, State 1, Line 33
BACKUP DATABASE is terminating abnormally.[/code]
Chances are the problem was between the brain and the keyboard, such as fat fingering the name of the container or storage account. Some examples include extra characters at the beginning of the SAS such as a question mark (?) or having double quotes before and after the SAS.
Why Use Cloud Shell and Bash?
In my experience, it is many less lines of code. If you do not have to create the container and want to just cut and paste the storage account name and access key, it is literally one line of code you need to write to generate the SAS required for the credential in SQL Server.
Hope this helps some of you out there.